Momma's Dark Chocolate Rum Cake

This cake will cure any chocolate craving you have!!

Baby Powder Mascara

Get thicker longer lashes without all the hassle of false eyelashes.

Hawai'i in your Kitchen

A mainland tip to get your next Hawaiian luau in your back yard.

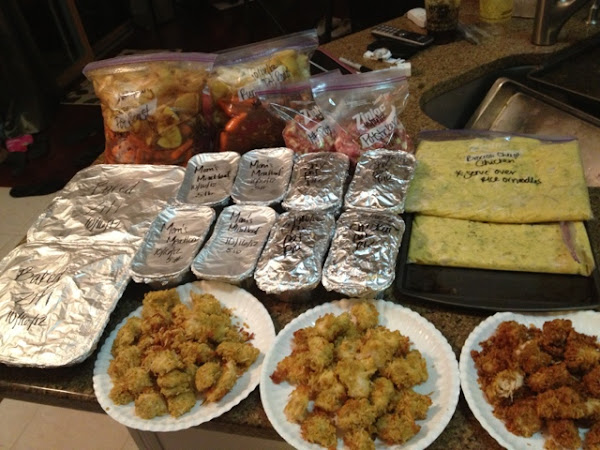
Freezer Cooking 1.1

Want to save tons of money and time? Come check out how I got 15+ meals for under $300 my first time ever freezer cooking!

Momma's Dark Chocolate Cake

A devilish, decadent, dark chocolate cake recipe with a fudge dark chocolate frosting; accented with coconut flakes and dark chocolate chips.

$4.00 Gel Manicure and Pedicure

Would you want to spend $75 on a Gel mani/pedi or $4? Read this article and see how saved $70+ on gorgeous gel nails.

What does your holiday card look like?

Do you like the personal touches of a custom made card, what about the newspaper-type updates some family members send out? Is it too much information and a waste of money? Or maybe you have to appease multiple religions during the holiday times. Find out what we do in our muti-theological and ethnic family!

Cupcakes Made from Love

Red Velvet and Funfetti Cupcakes with Strawberry and Cream Cheese Frosting

Electric Pea Soup Green for a Master Bath

Find out what delicious creamy yellow we picked out for this horrendous Master Bath Color.

Berry Easy Waffles

Make healthy, fruity waffles that your toddler will love.

L-O-V-E

Although this craft project may be time consuming, these yarn wrapped letters are an amazingly cheap and gorgeous way to furnish your homely abode.

The Perfect Hot Dog

Why you should always spiral cut your hot dogs before you throw them on the grill. Find out why this great conversation starter is our families method of choice for cooking our favorite franks.

Kalua Pig

Creating Hawai'i's Famous Kalua pork plate entre without leaving your kitchen.

Lomi Salmon

What is the 4-ingredient ethnic dish my Husband can't get enough of?

Hawaiian Mac Salad

The secret to this Hawaiian staple is in the noodle. Find out what it is here.

10 Minute Fried Rice

Find out how are family makes House Fried Rice in under 10 minutes.

Meatloaf

A meatloaf that will have you whole family asking for seconds!

Showing posts with label Beauty. Show all posts

Sunday, October 28, 2012

From Bone-Straight to Ringleted Curls


I have struggled my whole life to curl my hair, no product and no utensil would ever hold the curl and not to mention I am completely 'hair challenged'. I have almost straight hair- straight enough that a quick run through with a straightener will give me the board straight look. A look that I have rocked for the last 20 somethin' years! After my last straightener died I decided to look into a Chi Flat iron, I had heard about curling with a straightener but I figured if I couldn't successfully curl my hair with a curling iron I couldn't do it with a flat iron.... WRONG TOTALLY WRONG!!!.

I am proud to say with the help of Pinterest and of course my favorite beauty blogs I have 'mastered' my own hair curling. Now I don't have to wait until my next hair appointment to have a bombshell blowout with curls included... I can do it myself and so can you. I have tried two techniques that are very similar and work wonders on stubbornly straight hair. I truly believe this can be done by anyone!!

  1. First separate my hair into sections.
  2. Starting with the section that is going horizontally from ear to ear (everything below that line); grab a chunk of hair (I use different size pieces of hair to get a more natural look) 
  3. Begin to straighten from the root down towards the end (I am right handed so I hold the straightener with my thumb on top, ready to flip it). 
  4. When you get to the place where you want the curl to begin, flip the flat iron 180 degrees or to where your fingers are now toward the ceiling (Your hair will be coming out of the top of the straightener). Make sure to guide your hair into the straightener (I hold onto the end with my free hand)
  5. Now, slowly glide the straightener down the piece of hair (the slower you go- the tighter the curl).  
** If this does not give you the curl tightness that you want, (sometimes down here in the deep south the humidity is so bad I have to really make sure that my hair sits in that ringlet position hence technique number two). So try this:
  1. Separate hair into sections 
  2. Starting with that same section as listed above grab a section of hair and begin to straighten down the piece of hair.
  3. When you get to the place that you want to start the curl, flip the flat iron over 360 degrees (Hair is now going to fall towards the ground like normal only it is wrapped around the straightener once...make sure you are guiding the hair to the other side of the straightener) and glide down the hair.
  4. When you get to the bottom, don't let the strands of hair go all the way through, and re-curl up your section of hair to the base and hold for a few seconds. 
  5. I then let the ringlet fall out (this technique always gives me Shirley Temple curls that are great for pulling out to loose curls)

This is using technique two and then running my hands through it to loosen the curls.

Long-Lasting Lipstick Trick

I learned this awesome trick from Lauren Conrad when she appeared on The Wendy Williams Show earlier this month. I am not an avid show watcher like my Mom, but this morning I was especially glad I caught the segment with former "The Hills" star and fashionista LC. She spoke about two trademarks many of her fans know and love her by- cat eyes and long lasting gorgeous lips. I never used to wear lipstick- I always hated the constant touch up and smudging but after learning LC's little trick, I fell back in love with this cosmetic classic.
  1. Line your lips with lipstick or liner- I use a lip brush and make dots at the 'V' and outsides of my lips and then connect the dots, that way I can make sure I stay in the lines :)
  2. Next fill in the lip with lipstick via brush or tube
  3. Take a powder brush and brush on a light coat of powder- I use baby powder since I carry it with me for the Baby Powder Mascara; but any form of sheer powder will work.
  4. Now Apply a final coat of Lipstick and you are ready to rock color longer than you ever have before! 


**This doesn't guarantee that your lipstick will not come off, but it definitely made my lipstick last for most of the day.


Friday, October 26, 2012

Want the 'False-Lash Look' without the hassle?

First, apply your mascara normally and then before apply a second coat, take a q-tip or small shadow brush and swirl it in Baby Powder. Now take the q-tip or brush and add the powder to your lashes. (Try not to blink incessantly or else you will blink all the powder off.)Then apply your second coat of mascara.  The powder acts as a base/extender for the next coat of mascara to thicken and lengthen your lashes. Viola, now go ahead and bat those beauties. 


Every woman wants long thick lashes just like the women in the commercials, but as we all know that just isn't possible (unless you are a professional make-up artist and/or have a good set of false lashes). Personally, I have tried everything from the self-adhesive/glue on full set, semi-set and even the sometimes aggravating individual lashes. I even got to the point of getting them professionally done (OMG, they looked amazing- but not budget friendly and can be a hassle, especially when you need a fill in). Just like many women out there I have experimented with all different brush shapes and sizes and I have come to the conclusion that mascara is similar to shampoo/conditioner there is no single mascara that will make every woman's lashes 'just pop'.  After asking many women what brand of mascara was their favorite I learned that for everyone it is different- very few times did I get the same answer and if I did it was normally from women who were related or knew each other. This is the same thing with hair-care products, different hair products work best with your specific hair and may not for others.

With all that said I have found that by mixing mascara (I have found Loreal eye products work best for me, specifically voluminous and the Double Extend) and combing a trick of the trade; you can get lashes close to that of the commercials. 

First, apply your mascara normally and then before apply a second coat; take a q-tip or small shadow brush and dip it in Baby Powder. Now take the q-tip or brush and add the powder to your lashes. (Try not to blink incessantly or else you will blink all the powder off.)  Then apply your second coat of mascara. The powder acts as a base/extender for the next coat of mascara to thicken and lengthen your lashes. Viola, now go ahead and bat those beauties. 

Saturday, October 13, 2012

Want a Mani/Pedi for $4 dollars?


Let me first start off by saying I love love love getting my nails done. In fact, up until two years ago I had been getting my nails done every two weeks for ten years! That may sound crazy to some, but  that truly was a guilty pleasure I wasn't willing to ever give up. Well that all changed after having my son, first of all, I just didn't have the time anymore and most importantly I had a hard time justifying the cost. I became extremely interested in finding good deals and figuring out how to stretch the dollar (you know like the crazy coupon ladies) but I just had no idea where to begin. Now, I know that Sally's and stores around the world just like it have the do-it yourself kits and packages in all things beauty but the nail world just didn't seem like the place that I would be able to see a great copy of the product for less than half the price; plus I am a horrible painter. I mean who really wants to give up those comfy lounge chairs, the big tv screen and that's right, 1.5 to 2 hours of uninterrupted "me" time! 
Enter my best girlfriend in the whole entire world. About a year ago she opened my eyes to gel nail polish in the nail world and I was forever changed! I was an acrylic-aholic every 2 weeks I would get a fill in and every other visit was an all new set. A horrible routine for your nails, but I had a nervous habit of chewing on my nails as a kid and surprisingly enough the acrylic deterred me from chewing. (I digress) After making the switch to gel within the salon I saw a vast change in my nail, less breaking, less ridges, no dreaded grow out line from the acrylic, and most importantly it lasted longer and was a cheaper option. However with the pedicure I was spending anywhere from $75 to $120 (with tip) every 2.5-3 weeks. 
While my bestie was going through college she discovered the Red Carpet Gel system at Ulta; this was my first DIY gel nail system I bought, and it changed my life. I then began looking for other systems and on a trip to Walmart I saw SensatioNail , a brand new Nailene line of amazing gel polish. So I decided to try it out. Fast forward to a year later and they have grown to numerous gorgeous colors and now a magnetize and french tip set. For roughly the last year I have been hand painting on the white tips for my gel nails which for me is ridiculously hard (remember I'm not the artist, especially not left handed). Now they have the perfect solution and I am so disappointed I never thought of this. If you check out the SensatioNail Website you can catch full tutorials and find stores that sell the product near you. 
  • Starter Kit- $49.95
  • Nail polish- $11.99
  • French polish kit- $14.99
  • extra tips (100)- $6.99
I know you may be thinking $50.00 for a starter kit is a lot but it pays for itself over and over again. The average nail polish bottle gives you 50 manicures that's with two coats; obviously, depending on how thick you like your nails the most optimal your savings will be. Personally I like my nails almost as thick as acrylic so I'll say I only get 25 manicures. Even with those numbers, after your purchase of the starter kit (the light, gel polish, base, cleanser, and utensils) my manicures drop down to 2 dollars and pedicures are the same. Not to mention, any time I want to get crazy and go outside my norm of french I only pay 11.99 for a new color and that just added 25-50 more manicures to my collection!
I'm definitely not saying give up your "me" time especially if that is normally your escape. But what you could do to help spread the dollars that you are spending, is give yourself a fill in. Sometimes after getting a salon gel manicure, I give my self a fill in (if I get french or a color I have). Lasting me to the untrained eye at least a good 1-2 weeks! Another option is just buying yourself the starter kit and using it as your top coat on regular nail polish. I don't know one woman who doesn't want at least a top coat that actually protects the nail underneath and is dry instantly after curing! What are your thoughts on at-home gel systems?