Momma's Dark Chocolate Rum Cake

This cake will cure any chocolate craving you have!!

Baby Powder Mascara

Get thicker longer lashes without all the hassle of false eyelashes.

Hawai'i in your Kitchen

A mainland tip to get your next Hawaiian luau in your back yard.

Freezer Cooking 1.1

Want to save tons of money and time? Come check out how I got 15+ meals for under $300 my first time ever freezer cooking!

Momma's Dark Chocolate Cake

A devilish, decadent, dark chocolate cake recipe with a fudge dark chocolate frosting; accented with coconut flakes and dark chocolate chips.

$4.00 Gel Manicure and Pedicure

Would you want to spend $75 on a Gel mani/pedi or $4? Read this article and see how saved $70+ on gorgeous gel nails.

What does your holiday card look like?

Do you like the personal touches of a custom made card, what about the newspaper-type updates some family members send out? Is it too much information and a waste of money? Or maybe you have to appease multiple religions during the holiday times. Find out what we do in our muti-theological and ethnic family!

Cupcakes Made from Love

Red Velvet and Funfetti Cupcakes with Strawberry and Cream Cheese Frosting

Electric Pea Soup Green for a Master Bath

Find out what delicious creamy yellow we picked out for this horrendous Master Bath Color.

Berry Easy Waffles

Make healthy, fruity waffles that your toddler will love.

L-O-V-E

Although this craft project may be time consuming, these yarn wrapped letters are an amazingly cheap and gorgeous way to furnish your homely abode.

The Perfect Hot Dog

Why you should always spiral cut your hot dogs before you throw them on the grill. Find out why this great conversation starter is our families method of choice for cooking our favorite franks.

Kalua Pig

Creating Hawai'i's Famous Kalua pork plate entre without leaving your kitchen.

Lomi Salmon

What is the 4-ingredient ethnic dish my Husband can't get enough of?

Hawaiian Mac Salad

The secret to this Hawaiian staple is in the noodle. Find out what it is here.

10 Minute Fried Rice

Find out how are family makes House Fried Rice in under 10 minutes.

Meatloaf

A meatloaf that will have you whole family asking for seconds!

Showing posts with label Chow Hall. Show all posts

Monday, October 29, 2012

Freezer pot roast

I am very pleased to report this was an absolute hit in our household and I couldn’t be happier. The best part is that all I did was put it in the crock pot and forget about it. Now I know pot roasts aren’t that hard to prep for slow cooking… but I didn’t even have a prep time unless you count walking from the fridge to the Crockpot. J I have always loved pot roast- I mean who doesn’t, but I have never had the confidence to do it myself (This was a meal my mom had perfected over the years and I just didn’t think mine could compete with that but I am happy to say that it is at least in the competition now). I featured this exact freeze ahead pot roast in my Freezer Cooking post; however I suggested using your own pot roast recipe and just pre-assemble it and then freeze. But since this recipe got the family seal of approval, I am more than happy to share. (Note: This is a loose guideline of how I make my roast, many people put celery and other vegetables that there family enjoy. I pick vegies I know we will eat so I also use a lot of them. Make sure that when you are picking out the food at the grocery store you pick the vegie and amount that is suitable for your family. I make this for a family of three with leftovers for lunch and possibly dinner the next night. If you have big eaters you might only make it to lunch the following day.)

What you’ll need:
  • 3-4 pound Chuck roast
  • 8-10 Potatoes (small to medium sized, quartered)
  • 1 bag of Baby Carrots
  • 5-7 Onions (medium sized, quartered)
  • 2 (9-10 oz.)  Jars of Brown gravy (I uses Heinz homestyle savory beef 18 oz.)
  • 2 packets Beefy onion Soup mix
  • Garlic powder to taste

What to do:
To prepare for cooking:
  1. Place roast into Crockpot, add chopped veggies around the roast and then add one packet of the beefy onion soup mix, garlic powder and follow up with the gravy. 
  2. You can add the extra packet of soup mix if you aren’t able to do so mid-cooking. I am usually able to be at home during the halfway mark so that is when I usually flip the roast, add the other packet of soup mix and any gravy if needed (Don’t worry if you can’t be home to do this, it still tastes amazing). At this point there is normally enough juice/gravy in there to really mix in the soup mix in. 
  3. Once you have everything in there just let cook on low for 8-10 or high from 4-6 hours.

To prepare for Freezer:
  1. Place roast into freezer bag followed by garlic powder, gravy and one onion soup mix into the Ziploc overtop the meat. 
  2. Add veggies- if needed, use an extra gallon baggie. 
  3. Place in freezer. 
  4. Make sure you leave a beefy onion soup packet for the day you choose to cook the roast.

To cook:
  1. Take roast out the night before and let thaw out in fridge. 
  2. Place roast and veggies into the crockpot (it’s ok if it is still frozen) and cook on low for 8-10 hours or high for 4-6 hours.  
  3. Go ahead and add the extra soup packet if you can’t at the midpoint. If you can wait until then, just flip the roast, add the soup packet and any gravy you see fit (personally, I wait till the end and add gravy after I have tasted it).


Saturday, October 20, 2012

10-Minute Fried Rice

There are so many different ways to make fried rice. This is just a guideline of how to cook my family's version of an Asian classic. When I would ask the elders or cooks in the family for recipes, I always remember getting vague measurement and even sometimes ingredients- and honestly I am starting to believe that, this method works very nicely with Asian cuisine. Mostly this dish is based off of personal preference. So feel free to experiment as you wish:

Ingredients:

  • Day old rice (it can be fresh rice but to get a more authentic taste you need day old)
  • sesame oil
  • frozen (or fresh) veggies of your choice (I use frozen medley of carrots peas corn and green beans)
  • Spam/ham/tofu/meat/seafood of choice (we pick based on main course)
  • scallions
  • eggs (well beaten)
  • soy sauce
  • salt and pepper
  • garlic 
  1. In a large wok or frying pan (chicken frying pan works well too) on med-high heat add a few tablespoons of oil. Enough to fry your rice.
  2. Now add your meat. (If you are using beef, pork, or chicken make sure it is cooked all the way through if you like well done meat, and if you want rare make sure it is mostly cooked through.)
  3. Season with Soy sauce (or any oriental sauce of your choosing), salt and pepper, garlic and some scallions. 
  4. Now add your veggies and a tad more oil and Soy and spices (if you prefer). 
  5. Push rice mixture to one side of the pan and pour the beaten egg mixture in. Allow eggs to scramble and then stir into rice mixture (Sometimes when I make a large batch of Fried Rice I pre-scramble my eggs in a frying pan until they are almost done and then when its time I just throw in the wok and go- so do whatever is easiest for you)
  6. Taste the mixture- In my kitchen this is always the best step. I do most of my recipes off of 4 senses- taste, smell, sight, and feel. Taste is always the most important and the most fun. 
    1. if you think it needs it... Add it. Fried Rice is like a pot luck of leftovers- anything goes.
  7. Now remove from the stove, garnish with scallions and serve!
Enjoy!

Warning: Rich Decadent Flavors


Do you like Pumpkin? 

Do you like Brownies? 

Would you love a rich, moist, chocolate brownie with a taste of the Fall Season?

If you said yes to two of the three then you will love these decadent brownies. How could you go wrong with 2 of the world's best flavors! After pinning this on Pinterest, I decided to make them in October to bring in the cool-ish (well it's still hot down here in the deep south) weather. Another plus, it only consists of two ingredients, a can of pumpkin and a box brownie mix; no eggs, no milk, no oil, no butter! 

  • 19.5 oz box of your favorite brownie mix, I used Dark Fudge (Family Size) Brownie Mix by Pillsbury
  • 15 oz can of Pumpkin 
THAT'S IT!!

Preheat oven to 350 degrees. Mix these two ingredients together. I also added a smidgen of pumpkin pie spice because I really love pumpkin flavors. Place into a pan and bake for 25-35 min or until set. 

I don't prefer frosting but I have heard rave reviews about this one made specifically for these brownies.
Frosting:
  • 1/2 cup butter
  • 2 cups powdered sugar
  • 1/4 tsp pumpkin pie spice

First Cream butter and pumpkin pie spice until smooth. Then turn mixer to a low setting and add in the powdered sugar. Next, turn mixer up to medium speed and beat the mixture until fluffy. Now, spread all over your delicious brownines


Freezer Cooking 1.1

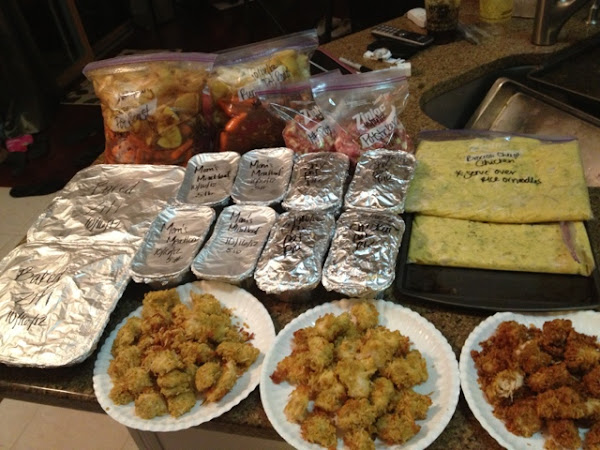
So after taking all the pictures and most importantly cooking all the food, I was going to immediately get on and post about my freezer cooking experience; but honestly, it wouldn't have been a positive post. It would have been me sitting here complaining to you, about how long I was in the kitchen, how I should plan each meal and what sequence to cook them in. Needless to say it wasn't my favorite moment of cooking but in the end it was soooooooo worth it!!!

Lately I have been researching Freezer Cooking more and more, for those of you who haven't heard of this "procrastinator's nightmare"; it is basically where you cook or prepare meals to go straight into the freezer for a later date. I had first heard about this idea when I was pregnant with my son, so many magazines and fellow military wives/moms told me to make meals ahead for those sleepless nights after the baby is born. That way all you have to do is reheat the meal there is no prep time. I liked the idea but my husband's schedule was so hectic the thought of even spending one full day in the kitchen, pregnant none-the-less, didn't sound appealing at all; and because of the hubby's hectic training cycle, my amazing mom was going to be around to help with dinners and any and everything we needed. So I shrugged off the idea of freezer cooking.

Flash-forward 19 months later and I wish I would of gotten into it back then because now I really have no time. :) Between toddlerhood, the hubby's training cycles and deployments, we play a lot of the "what's for dinner game". I will say however, that within the 9 months that I was pregnant, I learned to plan a couple days in advanced; and shortly after our son was born the planning extended to around two weeks sometime longer, sometime shorter depending on people coming over for dinner and whether or not we dined out.

So this past weekend was a long weekend for the hubby and the tot was at Grandma's, so we set out for the Commissary (Military Grocery Store) to do our mid month shopping. I hadn't planned to do any extreme freezer cooking but I figured I would just cook extra and freeze the left overs for some meals and then if I felt up to it, prep a few others for the upcoming chaotic week. Well I got a little overzealous and pushed myself to cooking around 15 meals for our family of three, with a few grab and go sides along with food to spare for  freshly cooked meals. I spent $288 at the commissary and around $100 at Walmart for odd and ends, which flabbergasted my husband and myself (we usually spend around $400-600 a month on groceries that last well into the next pay period- Obviously we haven't gotten into the coupon-ing thing just yet).

Here are the meals that I got out of our food:

  • 2- Baked Ziti 
  • 4- Personal Meatloaf
  • 4- Personal Chicken Pot Pie
  • 2- Chicken Cheese and Broccoli Sauce
  • 2- Pot Roast meals
  • 8- Homemade Chicken Nugget Meals (10 pcs.)
  • Spaghetti Sauce
  • 2lbs. of Taco Meat
  • Lasagna (8x8)


Now this is what my fridge looks like.... Meals Galore!!

Monday, October 15, 2012

Meatloaf Everyone Will Eat

Every time I serve this dish I get asked for the recipe (and most frequently from people who usually don't eat meatloaf) so here it is for every meatloaf and non-meatloaf eater out there. This meatloaf is truly that, a loaf of meat- there is no ketchup (at least not in it), no celery or tomatoes, just a juicy flavorful meatloaf. I grew up mostly eating Asian cuisines so when my mom would cook spaghetti, pot roast, corn beef, or even meatloaf; it was a rare enough  dinner that they would get devoured in no time. :)  Meat loaf, mashed potatoes and corn became an all time favorite of mine. However, when I started cooking for my husband he very quickly informed me that he highly disliked meatloaf; this coming from a man who can willingly eat a MRE (Meals Ready to Eat- basically a meal in a bag that our soldiers can eat whenever they can't get to a chow hall or chow can't be brought to them; i.e. out in the field on missions). After I picked my jaw up off the ground, I proceed to ask him what kind of meatloaf he grew up eating. His was one like many others I had eaten at friends houses growing up. There was Ketchup baked inside and smothered on top, along with peppers, onions, and sometimes celery and/or tomatoes. I have to admit, I hated vegetables growing up, so maybe that is why my mom made her meatloaf  this way; but even so, now that I do eat vegetables, I prefer them on the side rather than in the loaf itself. I am happy to say that after trying the loaf, the Hubby quickly retracted the 'no meatloaf clause' to our menu and it has now become a weekly staple.
  • 2 pounds of meat (I use the leanest meat I can find)
  • 1 packet of Beefy Onion soup mix (two if you like lots of onions)
  • 2 pieces of bread (cubed- I use wheat but any kind you have will do)
  • 2 eggs
  • Garlic 
  • Worcestershire Sauce (I use French's extra tenderizing)

  1. Preheat oven to 350 degrees.
  2. Place meat into mixing bowl and add cubed bread, packet of beefy onion, both eggs.
  3. Mix ingredients very well and then season with garlic and Worcestershire until fragrant or to your own palates content.
  4. Next pack into a loaf pan and cook for 1 hour and 15 min. 
*if you want to make this a freezer meal you can wrap in tinfoil and freeze for at least one day allowing the loaf to hold form so you can have the loaf pan for other baking recipes.


Sunday, October 14, 2012

Hawaiian Mac Salad

This staple in the islands and is made unlike any other macaroni salad I have ever had; and served with just about every meal, especially at lunch time. The overly fat noodles are of the utmost importance in this recipe and the creamy mayo mixture, spiced with your basic salt and pepper is a great base for a noodle salad  that you can jazz up any way your stomach desires.

  • 1 pound of elbow noodles 
  • 1/4 to 1/2 cup of finely chopped carrots
  • 1-2 cups of best foods mayo* (Hellman's will work also)
  • 1/4 to 1/2 cup milk
  • salt
  • 3-5 green onions
  • pepper
  • cider vinegar (for a tang)
* Unfortunately, I have yet to find a place that sells Best Foods Mayo but is made under the Hellman's brand and that's what I usually buy any way.

  1. Prepare the noodles according to the box, except for the time, Hawaiian like their noodle's like they like their women, Thick :). So over cook the noodles till they are nice and thick. Drain the noodles* and rinse with cold water and let cool for 10-15 minutes.
    1. * I have heard mixed reviews about using the cider vinegar and believe me every time I have used it I always tell myself I will never do it again- because the smell is so nauseating. But to be truthful, every time I have used it, it does give the zing that the island salad has. 
    2. So if you are willing to be daring enough, or just like vinegar; once you drain the noodles, pour the vinegar over noodle and let soak in. (I'm not a huge vinegar fan so I leave my noodles in the colander and pour the vinegar over while I am stirring the noodle). I then rinse the noodles and let cool for 10-15 min like listed above.
  2. While that is cooling you can chop up your carrots, onions, and any other foods that you want in the salad (peas, celery, potatoes, eggs, etc).
  3. Now to make your "dressing". In a small bowl combine half of your mayo and half of your milk. Add a pinch of salt and pepper and whisk together (make sure you taste this mixture and make it too your liking, most people I know use closer to 2 cups of mayo and an equal ration of milk- but once again it is personal preference. Once your noodles are cool and you have added your vegetables; pour your dressing over the salad and mix together.
  4. Place into the refrigerator and let cool. Just before serving add the remainder of mayo. Mix well and there you have it. 
'Ono 'Ono Macaroni Salad!!

Lomi Salmon

Lomi Salmon, the most common way that I describe this dish to people who aren't familiar to the Hawaiian cuisine is that it is Pico de gallo (a salsa) with salmon in it. With that said I do know people who eat this dish with chips and tell me it is quite tasty. I, however, choose to eat it the traditional way... straight from the bowl. My husband would eat this dish at some point every day if he could; I think he really loves it because of its close relation to sushi.
This recipe is a base recipe, one of the many great things about Hawaiian cuisine is the ability to change the meal to your preferences. For example I am a big onion person- I love them, but my best friend and husband  are the ones who pick the extras out and give them to me :). With that said customize this dish to your palate.

  • 1 pound of Salted Salmon*
  • 8-10 tomatoes diced
  • 1-2 onion
  • 1 bundle of green onions, white and green diced
  • Kosher salt
** Salted salmon is a way of curing the salmon before preparing it for this dish. In order to cure the salmon get a casserole dish and line the salmon inside, along the bottom. Sprinkle the salmon with salt (a decent amount, you can always "wash/soak" some of the salt out of the salmon), and then cover and place into the refrigerator for overnight - 3 days. (I have never cured the salmon for longer than 24 hours so if you choose this method please comment and tell me how it comes out). Make sure you flip the salmon one time, during its stay in the salt bath. I usually flip mine right before I go to bed at night. And also don't worry if you don't have a casserole dish or are running low on space in your refrigerator, just use a zip lock plastic gallon bag (make sure it is sealed tight) and lay the salmon out flat to make flipping easy. In the morning, I usually wake up and test the salmon, if the salmon is to salty I fill the bag up with ice water and let soak for 30 min-1 hour switching the water every 30 min (depending on how much salt I am trying to soak out). Also remember, you can always add a little salt to the final product if you are worried that it is too much sodium during the process. If the salmon is to your liking, then you are ready to begin with the Lomi salmon recipe:

  1. Dice your salted salmon into small cubes and dump into a large mixing bowl or container.
  2. Then dice your tomatoes (its OK if you have some seeds and juices), onions and green onions and place into the large mixing bowl. Now that all your ingredients are in the bowl you just need to add 6-10 ice cubes (depending on how soupy you want it) and refrigerate at least 2 hours before serving. This is definitely a dish that you want serve ice cold especially the first time. Salmon served in this fashion at room temperature could be a texture issue for some people. So, it's best served cold.
  3. Remember you can't over mix this recipe, Lomi in Hawaiian means to massage and the full name of this dish is Lomi Lomi Salmon... So massage massage that salmon.


Kalua Pork

Mainland Kalua Pork:
When I found out that you could recreate Kalua Pork in a Crockpot I fell in love with my Crockpot all over again. I grew up really embracing and prideful of my Hawaiian heritage and wanted to learn everything I could about it. However, growing up in the north suburbs of Atlanta, your access to the lush vegetation, crops, cuisine, or even culture is extremely limited. Thank goodness for the world wide web!
After much research, sifting through, and experimenting with many recipes I believe I have finally gotten this recipe the closest I can to that of the traditional imu style pig. On a sidenote, if you grew up on this or have a cultured palate for it I can promise you now that this will only tease you to get the real thing. So in that case I would honestly suggest building an imu in your back yard. :)
Here's how I make my Kalua Pig

  • 3 pounds Boston Butt (picnic roast, or pork shoulder will do) well marbled with fat
  • 3 tbsp. Liquid Smoke (Hickory for stronger flavor or Mesquite for milder) I use a combo of both
  • 3 tbsp. Kosher salt (Hawaiian Salt if you can get it)
  • Small head of cabbage sliced into long strips

  1. I first line my Crockpot with a liner just for easy clean up afterwards. Then I place the roast inside the Crockpot and measure out the liquid smoke and pour over top. There's no need to be pretty it just needs to get into the pot. Next I measure out the salt and sprinkle over roast.
  2. Next, fill the Crockpot with water to cover the roast. A rule of thumb I have found to work is the weight of the roast in pounds is equal to the salt and liquid smoke. For i.e. 6# roast would require 6 tbs of smoke and salt, and water to fill.
  3. Once you have filled with water you can place the Crockpot on Low for 8-10 hours (I usually do 9) or Low for 4-6 hours. Another tip I have noticed is with larger roast you may want to flip the roast at the halfway mark. I have cooked it with and without flipping, and both come out just as succulent. Leaving the roast on one side can make that side less juicier than the top of the roast; but the great thing about Kalua pork is when you shred it it all mixes together so it doesn't matter!
  4. About 10-15 minutes before the roast is done, I place the sliced cabbage into the Crockpot (we like our cabbage with a little crunch, just leave the cabbage in, until its done to your liking).
  5. Take the roast out and shred with a fork, it should fall apart. I then use a slotted spoon to get the cabbage and mix in with the pork. Serve over hot rice and ENJOY!!

Hawaiian Luau brought to the East Coast

Ok, so I can't promise a boar of this size or really any wild boar at all,  nor can I promise that half naked, gorgeously tan, sculpted Hawaiian men will be delivering your "ono-licious" food ('ono means good to eat, yummy, delicious in Hawaiian). But what I can say is, that this meal will have your guest and family talking and begging for seconds. A traditional pork plate in Hawai'i consist of Kalua pork and Cabbage served with scoops of rice and a scoop or two of traditional island style macaroni; and if you are really into getting the full experience and a huge hearty meal, you can have a side of Poi, Long rice, Lau Lau, and (my hubby's favorite) Lomi Salmon.

 This is what a traditional combination plate lunch looks like- no fancy plates, just a Styrofoam plate filled to the max with 'ono 'ono food! pictured above (starting from the top left clockwise) Poi, Poke, Kalua pork, Lau Lau, Chicken Long Rice and Lomi salmon.
My luaus don't look like this unless I am truly cooking a feast, the traditional luau. Not to mention, I have yet to find a place to make a copy cat lau lau (but don't worry I will figure it out). A common Hawaiian meal in my household consist of the common basics I listed above, Kalua pork and Cabbage, Lomi Salmon, and Macaroni Salad.... well and of course some dessert. (pictured here is Pumpkin Brownies recipe to come later)

Cupcakes Made from Love


Red Velvet Cupcakes and Funfetti Cupcakes with Strawberry and Cream Cheese Frosting

You may be asking why the 7 cupcakes on the left are not frosted, well for one- we don't like to get our little man that much sugar (we thoroughly enjoy our sanity) and secondly- I may love to bake but I am not a big fan of frosting at all; so I have been dabbling in the world of baking one toe at a time to see if I can find recipes and creations that non-icing eaters will eat. This was an OK one for me.. I prefer my fudge icing but it was definitely a hit with the kids and men around the house!

Momma's Dark Chocolate Cake

Momma's Dark Chocolate Cake


This a variation of my dark chocolate cake that I accidentally stumbled into making; unfortunately, I have yet to fully reincarnate this masterpiece, but will be trying again for my birthday cake. And to be honest would you complain about remaking an amazing chocolate cake until you got it to perfection.... Nope! Although my core and lower body definitely don't thank me when I have to up the workout the next morning after having a slice :). The cake itself I have managed to make the same every time, however the fudge-like frosting I am still working on. The recipe will be on here shortly followed by better pictures of the new masterpiece!

Saturday, October 13, 2012

The Perfect Hot Dog

After hearing about this ingenious idea through the world wide web, we just had to try it, so I went out bought some Hebrew National Beef franks (our hot dogs of choice, but you can use your favorite), skewers, buns and condiments. We then skewered the dogs down the middle and spiraled the knife down the hot dog, at a slight angle cutting all the way down to the skewer. Once you take them off the skewer then you can throw them on the grill and now you're ready to garnish with your favorite toppings. The best part is no more messy hot dogs spilling out all over the place. These new juicy grooves allow the toppings to have a place to fall into. Making this a great conversation starter and great for those loaded chili cheese coneys my family loves. 
How do you like your hot dog?

Berry Easy Waffles

Our 18 month old kills these every time I serve them for breakfast. They are a great finger food especially when we are on the go. The fruit is a great sweet substitute for syrup if your kids will take that route. My hubby likes them plain but devours them with syrup! What are your favorite ways to serve waffles?

Recipe for Berry Easy Waffles
  • Bisquick or any of your favorite waffle mix
  • Add your favorite berry or fruit
  • pour into waffle iron (or in my case an old sandwich maker, thanks Mom)
  • cook till fluffy and you are ready to eat.
Easy as 1-2-3-4